Attention: This guide is way old school and is no longer relevant. It’s posted here solely for the purpose of nostalgia and because I hate deleting previous guides and posts. 😉 If you’re looking for a way to level crazy-fast, then I suggest getting the Zygor addon. It’s a paid addon, but the time and frustration it can save you pays for itself many times over. I have a review of it here, which is dated as well, but I’ve used the addon recently in MoP and the basic info still applies.

Welcome to the first installment of the HuntsmansLodge.com Hunter Leveling Guide. The information presented on this page is intended to assist you during your early adventures as a new Hunter, all the way from your beginning quests to when you obtain your first mount.
Gearing for a Low Level Hunter
Addons and Macros for the Low Level Hunter
Professions for the Leveling Hunter
Key Concepts
Hunters are arguably one of the easiest classes to level in the game. However, familiarizing yourself with the fundamentals of the class early on will help to make your journey to 80 a more enjoyable and pain free process.
Let me begin by pointing out the obvious…
Maintain Distance Between You & Your Target
Although Hunters begin with Raptor Strike as their only special attack, reliance upon melee is a recipe for frustration. The Hunter’s strength lies in the ability to provide sustained ranged damage. Fortunately for us, this becomes a relatively easy goal once we obtain our first pet at level 10.
Survival
The leveling game is not about how much damage you can dish out. In fact, focusing solely on ranged damage can actually be counter-productive at the lower levels as it creates a tendency for you to pull aggro off of your pet. The longer your pet can maintain aggro on its target(s) while you sit back and pew-pew, the faster the mobs will die and in turn, the quicker you will level. High health, along with your pet’s ability to soak up blows and maintain aggro are the basic principles of low level huntering.
Pet Management
In keeping with the survival concept, pet management is crucial while leveling. Keep a watchful eye on your pet’s happiness level and especially its health. The happier your pet is, the more damage it will do, and the longer it’s alive, the more damage you both will do. 😉
In addition to keeping your pet fed and healthy, you also want to maintain obedience. Command your pet wisely and avoid putting them on aggressive, or else you may suddenly find yourself overwhelmed with hostile attackers.
OK… So let’s get started… leveling to 10
While not terribly difficult, the first few levels for a Hunter can actually be the most frustrating. This is because we lack any defining crowd control skills, along with that other minor little thing we call a pet.
Kiting For Young Hunterlings
Up until level 8, your goal will be to start to learn the fine art of kiting. At level 8 you can train Concussive Shot, which will make the task of leveling your Hunter a much easier process. As I said earlier, one of your primary goals as a Hunter is to maintain distance from your target. Although we have the ability to attack from 35 yards away, not all mobs are going to drop by the time they reach you if you just stand there. Since we have no way of slowing them during the first few levels, here’s where learning the practice of kiting can help you on your way to becoming a better Hunter.
In order to efficiently kite, there are two things you need to concern yourself with:
- Your surroundings – Make sure you have a safe path in which to kite, and that you won’t be pulling additional mobs in the process.
- Your swing timer – This is the length of time required in between auto shots.
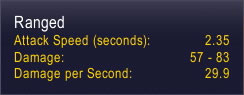 Using the screenshot of my Hunter’s ranged damage tooltip, you’ll see I have a 2.35 second attack speed. What this means is that it takes me 2.35 seconds after an auto shot before I’m able fire off another one.
So let’s say I open on a target that’s 35 yards away, but said target only needs 4 seconds to reach me if I just stand there. That means I’ll only get off two auto shots before the target reaches me. I could just finish off the target with my melee weapon once it starts attacking me, but that’s a clunky way of doing things and not very huntery at that. 😉
The proper way to handle this situation is to create additional distance between you and your target after every auto shot, only stopping long enough to fire off another one. This is achieved either via strafing (Q & E default keybinds) or simply running in the opposite direction.
Basically, after you open on your target it works like this…
- Move away from your target for approximately 2 seconds
- Stop and shoot
- Repeat until the target is dead
Personally, my preferred method of kiting is the jump shot variety. This involves running from your target to achieve maximum distance, then jumping as your swing timer is about to expire, landing to face your target, then letting your auto shot rip. As soon as the auto shot fires, turn tail and run again, repeating the process until the mob takes a dirt nap.
While not really a form of kiting, backpedaling is probably the easiest way to create distance between you and your target. The main problem with it, though, is that you can’t backpedal very quickly. As you start to gain a couple of levels, the mobs will begin to become hardier and will be gnawing on you in no time. My advice is there’s no better time to learn the jump shot technique than when you’re just starting out. This is something that you will need to know in order to be a successful Hunter, so the sooner you start, the better off you’ll be.
I’ll supplement this guide with a short video of this practice once I get a little time to put one together. 🙂
Hunter abilities trained from levels 4-8
At level 4 you get your first trainable skills from the Hunter trainer. These are Aspect of the Monkey and Serpent Sting. You’ll want to keep Aspect of the Monkey up at all times for the increased chance to dodge. Even though the goal is to keep the mobs at bay, there will be times when you’re going to get beat on. 18% additional dodge will come in handy. Serpent Sting will become your opener from here on out. You want to apply it first so that the damage is ticking away for as long as possible while you kite your target.
At level 6 you are able to train Arcane Shot and Hunter’s Mark. Life as a young Hunter starts to get easier at this point. You not only get a boost to overall ranged damage via Hunters Mark, but you also get your first instant cast shot. Kiting becomes quite a bit easier when Arcane Shot is thrown into the mix since you can now shoot on the run.
Once you reach level 8, you can learn Concussive Shot. This is where the Hunter class starts to become the easy mode leveling class everyone knows and loves. 😉 Like Arcane Shot, Concussive Shot is another instant cast shot which can be fired on the run.
For the next two levels, here’s how an average fight may go…
- Apply Hunter’s Mark to the target
- Serpent Sting
- Concussive Shot
- Arcane Shot
- Auto Shot
- Dead target
If the fight lasts longer than that, begin kiting.
Pets
At level 10 you start the quest chain which finishes with you learning the ability to tame a pet of your choice. Once you’ve completed the chain, you can then go out and acquire any tamable mob as long as it’s at or below your character level.
At the preemie levels, Hunter pets are all normalized apart from their unique ability. It isn’t until level 20 that your pet receives its first talent points, which you will then use to further define their role based upon pet family.
Choosing your first pet doesn’t necessarily have to be an involved decision. If this is your introduction to playing a Hunter, chances are you’ll want to experiment with a few pets along the way, so your first pet need not be viewed as a lifelong companion. Furthermore, Blizzard has a habit of reworking pet abilities, talents and mechanics every so often; so the pet that works now may not be the best option a few months from now.
A few good pet choices at level 10 would be:
- Bear – Bears have an ability called swipe which is fantastic for maintaining aggro. Swipe hits all mobs within melee range in front of the bear, and has a short cooldown of only 5 seconds.
- Crab – Crabs are a good choice for their special ability Pin, which does precisely what you think it would do. It allows the crab to put the squeeze on its target, pinning it in place and doing a small amount of damage in the process.
- Crocolisk – Crocolisks have an ability called Bad Attitude which causes the pet to instantly strike back at all of its attackers for a period of 45 seconds. The cooldown is a bit long at 2 minutes, but being that the ability lasts for a whopping 45 seconds makes the Crocolisk one of the best pet choices for leveling.
- Ravager – Ravager’s have a damaging ability which also stuns its target for 2 seconds. The cooldown isn’t too bad either, at a mere 40 seconds. The ability is called, of all things… Ravage. Go figure. 😉
- Spider – Spiders are worth a mention due to their ability to trap a target in place, similar to how the Crab’s Pin works. Although the spiders’ Web doesn’t inflict damage, it is a ranged snare which can be cast from 20 yards away.
 These are just a few pets I would recommend to first time Hunters once they reach level 10. The basic idea here is to get a pet that will either be effective for tanking groups of mobs by way of an AoE aggro generating skill, or one that has the ability to snare.
If you’re not in an area that any of the aforementioned mobs are located, or you’d prefer a different type of pet, then it’s really not that big of a deal. Pets don’t really come into their own until around level 40 or so, which is when you can start to really specialize them based on their talent tree.
Pet Management
Proper pet management is an essential part of playing a Hunter effectively. For starters, the better you utilize your pet as your personal pocket tank, the easier the task of leveling is going to be. Secondly, improper pet management can put you and (even worse) your party members in a world of hurt.
While out questing it’s a good idea to keep your pet on defensive mode. This will ensure that it will retaliate against your assailants. However, while in a dungeon it’s a good idea to keep your pet on passive and only use it to attack under your command. Aggressive mode isn’t really all that necessary. I use it occasionally in PvP, but beyond that it’s not really needed all that often. I suggest refraining from using it altogether as far as PvE is concerned.
Growl and Cower
It’s important that these two talents be present in your pet’s skill bar, because they not only require some degree of micro management, but are also susceptible to the autocast bug if you remove them from your screen.
Basically, you’re going to want to keep Growl on autocast and Cower turned off the majority of the time. Growl generates threat, where as Cower dumps some of it. Since you want your pet on the front lines soaking up all the blows, you want to be sure that it’s generating the maximum amount of threat possible.
When you’re in a dungeon, you want the opposite. Unless your pet is tanking the instance, you want Growl turned off and Cower on autocast so that your pet does not pull aggro off of the main tank.
Pet Attacks and Specials
My advice here is to just keep these on autocast. If you want to go pro style, you can turn auto cast off on your pet’s special ability if it happens to be some sort of a snare, and just cast it manually when needed. Unless you’re trying to make a name for yourself in the low level BGs or arena skirmishes, I say just leave the skills on auto cast. It’s one less thing to worry about and the mobs are going to die anyway. 😉
Leveling 10-20
Hunter Talents Levels 10-20
Along with your pet, the other big deal at level 10 is… you guessed it… your first talent point. For the leveling Hunter, the best place to begin is in the Beast Mastery tree. Providing yourself with a sturdy and powerful pet will make things much easier while out questing and soloing.
From level 10-14 you’re going to want to dump all of your talent points into Endurance Training. I can’t stress this enough. The extra health for you, but more importantly for your pet, is going to help immensely while fighting your way through the lower levels.
At levels 15 and 16 I recommend putting points into Focused Fire. Since we don’t get Kill Command until level 66, all this talent will do for you now is provide a passive 2% damage boost while your pet’s active. While it does provide a small boost to your damage, more importantly it gets you two points deeper into the Beast Mastery Tree.
Up until level 19, the next three points I’d suggest placing into Thick Hide. Most of the mobs encountered at the lower levels cause some form of melee damage, so boosting you and your pet’s armor is a good idea.
At level 20 I recommend going with Aspect Mastery. Aspect Mastery provides an overall damage boost for 2 of your aspects, Hawk and Viper, along with damage mitigation for aspect of the Monkey.
 In summary, here’s my recommendation for talent point allocation for levels 10-20:
- 5/5 Endurance Training
- 2/2 Focused Fire
- 3/3 Thick Hide
- 1/1 Aspect Mastery
Spells and abilities trained from levels 10-20
Level 10 introduces a whole new assortment of skills; many of them pet related. Most of them are pretty self explanatory, but the one I would like to point out is Aspect of the Hawk.
Aspect of the Hawk is the aspect you’re going to want to keep up about 99.9% of the time until you reach level 20. Now that we have a pet to tank our target(s), Aspect of the Monkey isn’t quite as important anymore. The RAP bonus gained from Aspect of the Hawk is more important from here on out.
At level 12, one of the important new abilities we learn is Mend Pet. This is something you’ll be using a lot, since your trusty pet is going to be relying on you to keep it alive. Use it and use it often. Your pet will love you for it. The other ability of note is Wing Clip. In addition to Concussive Shot, Wing Clip is going to be your best friend when it comes to snaring your attackers and creating distance from them.
Trainable at level 14, Scare Beast can be a relatively useful spell at times if you are trying to shake a beast mob off of you. However, it does suffer from spell pushback so usually a Wing Clip and run is a better alternative. Also, as the title indicates, it’s limited to beasts.
At level 16 Hunters learn their first trap spell (Immolation Trap), another melee ability (Mongoose Bite), and Aspect of the Cheetah. Immolation Trap is handy if used before or during kiting, as it will apply another DoT to your target as they run through your trap. Apart from being just another melee ability, the cool thing about Mongoose Bite is that it’s an instant cast attack which can be combined with Raptor Strike, allowing for a large melee burst potential when stuck in close quarters combat. My macros section will revisit this in a bit. Aspect of the Cheetah provides the Hunter with a 30% movement speed increase, which not only makes it easier to get from place to place, but it also gives you some emergency afterburners to throw on when kiting or escaping. The caveat is, if you get hit with a hostile attack while Aspect of the Cheetah is on, you’ll be dazed for 4 seconds. For traveling convenience it’s great, but while in combat, use it wisely and with caution.
Level 18 provides the Hunter with another trainable damaging shot in Multi Shot. This new shot is very powerful, but due to the fact that it can hit up to three mobs, you have to be selective with it. Definitely be careful when using this shot in dungeons, as it can very easily pull additional aggro or break CC, thus causing you all sorts of problems.

At level 20, the new spells and abilities we get are: Aspect of the Viper, Disengage and Freezing Trap. Because mana is a problem in the lower levels, Aspect of the Viper is one you’re going to rely upon quite a bit. Aspect of the Viper increases mana regeneration for the Hunter, but it reduces damage dealt by 50%. The trick here is to manage it wisely. My addons and macros section will provide some help with managing aspects.
Disengage is an incredible escape ability if used properly. It causes the Hunter to leap backwards, leaving melee combat. It’s most effective when preceded by either a Freezing Trap or Wing Clip, or when followed by a Concussive Shot. The funny thing about Disengage is that it’s greatly affected by terrain. For example, if your back’s facing an upward slope, your travel distance will be very short or not at all. To combat this, what you need to do is swing your body around so that your back is facing a flat or downhill area. Just make sure that your travel will not result in you either falling off of a cliff or pulling additional mobs. 😡
Freezing Trap is invaluable when it comes to crowd control. If you develop aggro during a fight, you can simply drop a Freeze Trap at your feet to put the attacker on ice until you’ve had time to escape, or until you are prepared to deal with them. Freezing Trap will also be your primary tool when taming new pets, as it allows you to cast Tame Beast while escaping damage during a tame. Simply drop it in the path between you and the mob you wish to tame, then start taming. As the mob approaches you to attack it will become encased in ice, and within seconds you’ll have a new pet without getting so much as a scratch.
Dual Wield becomes available at level 20 as well. Generally it’s preferable to equip a 2H weapon as you’re leveling, because when you do have to resort to melee, a slower hard-hitting 2H weapon will serve you much better. However, As I’ll mention here in a second, go with the combo that provides the best stats.
Hunter melee weapons are merely just “stat sticks” which are equipped to boost ranged damage. The damage of the weapon itself is trivial compared to the stats that are on it. 2H weapons are often itemized very well for Hunters, but if you happen to come across a dual wield setup that provides an exceptional stat bonus, then by all means go that route instead.
Gearing for a low level Hunter
Since leveling is a journey and not the destination that end game is, I don’t really see a need to get too specific when it comes to gear. Rather than show you what instances to run to get which gear, I’d rather just focus on stats. If you’re trying for a specific drop while leveling, you could very well be beyond the practical level for using the item once it finally drops. The best approach here is to just quest away, run instances and have fun, keeping in mind which stats are going to benefit you the most when upgrades present themselves.
The primary stat I recommend stacking early on is stamina. High hit points are very important, especially for your pet. Your pet inherits health from you, so the more stamina you stack, the more unbreakable your pet will be.
Up until level 20, I think it’s advisable to emphasize intellect next. Intellect will increase your mana pool (1 intellect equals 15 mana for a Hunter), plus it also increases the rate at which you level your weapon skills. Until we train Aspect of the Viper at level 20, Hunters are stuck with mana issues. Stacking intellect will give you a deeper mana pool, and enable you more access to your special abilities when you need them most.
I’d stick agility and attack power right here, but only until level 20. In the long run, agility and AP are going to be the Hunter’s mainstays, but early on they take a backseat to stamina and intellect in my opinion.
Crit is useful, but I wouldn’t gear for it personally. Crit doesn’t translate to your pet, plus your goal in the first 20 levels is not to get huge juicy crits. Well, unless you plan on hitting up some 10-19 WSG. 😉
Apart from some hit, the other stats which are useful to a Hunter aren’t really available at these lower levels. Having mentioned hit, one suggestion I’d like to make is that you grab a Simple Pearl Ring at level 17. This ring can be picked up from the auction house pretty cheap, or you can just find a JC to make you one if none are up for sale. At level 17 this ring provides 2.31% increased chance to hit, which is not only a good DPS boost, but more importantly it lessens the chances of you missing a crucial Concussive Shot or other damaging spell. Not missing on your damaging spells will also make you more mana efficient as well.
In summary, here are the stats you want as a level 1-20 Hunter:
- Stamina
- Intellect
- Agility and/or Attack power
- A smidgen of Hit Rating
The stats you’ll stay away from are:
- Strength
- Spellpower
- Defense
- Expertise
- Dodge
Although I do have a priority listed for gear itemization, I’d like to add that the best approach is to always go with whatever piece gives you the most bang for your buck. In other words, as long as the item(s) contain any three of the primary stats (stamina, intellect, agility), you’ll typically want to go with whichever item offers the highest stat count overall. For example, even though I place stamina as the primary stat, you’d be wise to equip a chest piece with 6 agility & 6 intellect over one with say 8 stamina. 12 stats > 8.
Until Hunters are able to train mail armor at level 40, we’re stuck with leather or cloth. While leather is obviously preferred for its higher armor, don’t necessarily turn your nose up at a cloth piece if it has nice stats. Hunters shouldn’t be getting hit all that often, so if you have a choice between a stat-rich cloth piece or a so-so leather one, go for the cloth.
Glyph Choices
As with all other classes, Hunters have their first minor and major glyph slots unlocked at level 15. For the minor glyph, the hands-down choice is Glyph of Mend Pet. This will be a glyph which you’ll use indefinitely anyway, so you may as well grab it now. It causes your Mend Pet ticks to increase your pet’s happiness by a small amount in addition to the healing effect. It’s a very useful glyph and will ultimately remove the reliance upon food to increase your pet’s happiness.
As far as major glyphs are concerned, there are quite a few choices here. I can’t honestly recommend any one particular glyph as a clear winner here, but I can tell you a few you should avoid.
- Glyph of Serpent Sting – This glyph is a waste at lower levels since most mobs will be dead before your Serpent Sting wears off anyway. Save this one for later.
- Glyph of Raptor Strike – Unless you plan on leveling in BGs, this glyph is largely a waste due to it being attached to a very situational skill.
- Glyph of Deterrence – Deterrence isn’t trainable until level 60. ‘Nuff said.
- Glyph of Aimed Shot – Aimed Shot is probably not a talent you’ll be speccing for at level 20. Save this one for later on when you’re tearing up the battlegrounds.
- Glyph of Scatter Shot – Chances are Scatter Shot is another one of those talents your probably not going to pick up at level 20. Also, this is another Glyph that lends itself more to PvP.
Now… if I were asked to recommend a few, they would be the following:
- Glyph of Arcane Shot – Reduces the cost of Arcane Shot as long as you have a sting applied to your target.
- Glyph of Hunter’s Mark – 20% more RAP for Hunter’s Mark.
- Glyph of Mending – 40% increased healing for your Mend Pet spell.
- Glyph of Aspect of the Viper – 10% increased mana regen while in AotV.
- Glyph of Disengage – 5 second shorter cooldown for Disengage.
Addons for the Low Level Hunter
As a new Hunter fresh out of the gate, there’s really not much that’s needed in the way of addons. In fact, you really don’t need any, but if you want to make life easier while questing then take a look at either QuestHelper or Carbonite.
Another addon worth mentioning is ViperNotify. This very basic addon alerts you to when you’re at full mana while in Aspect of the Viper. It’s pretty handy for managing your aspects, plus it’s one you’re probably going to find useful all the way through to 80.
Useful Macros for the Low level Hunter
Most addons are not worth the bother at this level. Macros on the other hand, are always useful. A wide selection are listed and discussed on my macros page, but I’ve collected these specific ones for use in the lower levels:
All-In-One Pet Care Macro
Heal, call or revive your pet all with one button. If your pet is dead and out of line of sight, then hold down the shift key.
/cast [modifier:shift] Revive Pet; [target=pet,dead] Revive Pet; [nopet] Call Pet; Mend Pet
Come Here Boy!
Puts pet in follow and passive mode. I include the passive so that my pet won’t rush back into combat if attacked.
/petpassive
/petfollow
Pet-Specific Feed Pet Macro
If you have the Glyph of Mend Pet then you really don’t need a macro like this, but just in case…
Substitute in the appropriate pet type(s) and specific food(s) as needed.
/cast Feed Pet
/use [pet:Wind Serpent] Bristlewhisker Catfish
/use [pet:Wolf] Mutton Chop
Aspect of the Hawk & Aspect of the Viper Easy Switch Macro
A space-saving macro that combines Hawk and Viper in one button. Tapping the key that’s bound to this macro will let you toggle between the two most used aspects. Using the “!” before each aspect ensures that you don’t accidentally turn it off if it’s already active.
/castsequence !Aspect of the Hawk, !Aspect of the Viper
Uber Wing Clip
This drops a Raptor Strike on your target while also slowing them with a Wing Clip in one swat.
#showtooltip Wing Clip
/cast Raptor Strike
/cast Wing Clip
Raptor / Mongoose Melee Macro
Use this if you’re stuck in melee range. It will hit your target with Raptor Strike and Mongoose Bite simultaneously if both cooldowns are up, and cast whichever one is available first after that.
/cast Raptor Strike
/cast Mongoose Bite
Wing Clip and Disengage
This macro allows you to throw a Wing Clip on your target just before you Disengage.
#showtooltip Disengage
/cast Wing Clip
/cast Disengage
Freezing Trap
This turns off your attack so that you don’t accidentally noob it up and break your Freezing Trap with an auto attack on your trapped target.
/cast Freezing Trap
/stopattack
Professions For The Leveling Hunter
As with any class, the conservative and profitable way to level your character is with two gathering professions. Any combination of Herbalism, Mining or Skinning would be just fine while working your way up through the ranks. All will provide you with a nice commodity income, as well as give you the passive skills.
- Herbalism – 5 second HoT available every 3 minutes.
- Mining – Bonus health.
- Skinning – Bonus to crit rating.
If you’re looking for a crafting skill that will complement your leveling Hunter, there is one combination of gathering and crafting professions that suit the class quite well. These are Skinning and Leatherworking. These two professions are useful because you can craft your own armor via mats you collect, all the way until max level. This combo is especially handy if you’re poor, since you’ll be able to keep your Hunter amply geared with minimal cost as you level.
Whew..! This guide ended up being considerably larger than I originally intended, but I gotta say I’m not surprised. I have a tendency to do that. What can I say… I like to be thorough. 😉
If you have any further questions or feel I’ve left something out, please leave your comment(s) below. 🙂
100% appreciate leaving this guide here for the sake of nostalgia. It’s so genius, that I wish there would be more guides like yours!
I leveled my main as a MM hunter. Fun and no real problems, even if it was a bit squishy at times.
Now I’m playing a BM hunter together with my son. It is a rather big difference from MM. I was trying to catch up to my sons hunter by doing a few extra quests alone.
Hunting Mottled Screechers in the Wetlands, I was attacked by five reptors at the same time. Three lvl 25 and two lvl 24. I was lvl 26.
You know what? It wasn’t a problem at all! My MM hunter would most likely have been squashed, but as a BM, all I had to do, was to let the pet handle most of it, while I healed and kept my aggro lower than the pet. And a good thing that I tamed a bear yesterday – swipe is nice!
OK, using a few heirlooms, I’m admittedly better geared then my MM was, but still .. http://eu.wowarmory.com/character-sheet.xml?r=Darkspear&n=Normur
(grin) Yes, BM is a major difference from MM. PUG’ed Gnomergan with a tank that couldn’t hold aggro from anyone, even me when I switched to aspect of the viper. So I whispered the healer that I would be setting my pet up for tanking and would he please take good care of it, and switched from Cower to Growl. That was fun!
Amazingly the tank stayed with us the whole run and never once complained.
Wow, that’s an indepth guide! Excellent resource for lowbie hunters.
I wish I had something like this the first time I leveled my hunter… I had to learn it the hard way… by dying 19 times in Durotar and then 50+ times in Barrens, near those pigmen!
Argh!
Great guide, I started leveling my little hunter today again from 22 to 27 in only 3 hours. I hope shes 80 by Cata 😛
I suggest using the Multi-shot glyph if you are going to instance a lot with the random dungeon, just one second off really helps in AoE damage that hunters lack at these levels.
Also, I’ve been using a bear since level 10, and I absolutely love it. Swipe with its 5sec cooldown, and high damage (13-17 base at my level, the only other high instant damage I found was boars 17-21 base), AND it being an AoE, it’s really powerful. Plus, since he’s tenacity, he can hold his own pretty easily. In an RFK, he went off and soloed a level 24 elite when he as level 25, and when I noticed him, he was low health but the elite died. Pretty good 😛
I’m probably going to pick up a Chimaera at level 60 for my exotic, and at 70 switch to a jormungar looking worm, because they are my favorite pets right now in BM PvP, along with Chimaeras. Then all I gotta do is pick up a wolf, and I’ll have a free spot, probably dedicated to a spider or crab for a non-bm pvp spec if I try one.
P.S. I’d love to see some 20-40 etc installments soon to go along with my leveling right now.
~Sheyla, Greymane US Allianc
@ npast
Welcome back! My period as SV for PvP was fairly short lived. I was running a double DPS combo for arena, and BM worked much better for it. I still queue a BG or WG every now and again as MM, but BM is still my favorite Hunter spec for PvP.
The pet bugs are so annoying. Last night I started doing a few low level BGs on my Orc Hunter and prowl was autocasting on my cat every time I entered a new BG. So essentially what I have to do now is remember to move my pet skills in and out of the pet bar when I PvP.
My pet’s been doing well maintaining aggro, but I think I’m going to try a bear soon. I want to see how well they do in the lower levels keeping the attention of multiple mobs. If I get overwhelmed by respawns as I did last night farming leather off the Worgens in Ashenvale, it can take too long for my cat to pick them all up. I want to give swipe a go and see how that works out for multiple mobs.
Very nice guide, I wish I had this when I started playing my hunter!
I would also recommend taming a ferocity pet, wolf after level 25 maybe, since, in my experience, a ferocity pet usually helps to kill mobs faster, thus making leveling faster too. Also, I’ve read on forums, and it has happened to me too that growl now can be broken — even if it is turned on, it won’t hold the mobs sometimes.
I would advise a new hunter to watch BRK videos on kiting, although I still haven’t fully mastered the jump shot myself, even after so much time playing 🙁 (there is a jump shot macro, but I haven’t tried it).
Off topic, I am sorry I have missed some of your latest posts, are you back to BM for PVP? I remember you posted that you went MM for rairing and SV for PVP?
Thanks!
npast
@ Orangeninja
The removed it from the tooltip, but it’s still there…
Taken from WoWWiki:
“Increases the rate at which weapon skills are learned. Before patch 2.0 this was listed in the tooltip, but it was removed after that. Despite this, tests show that intellect still increases the rate of skillups. If you want to level a weapon skill, asking for an Intellect buff, or using a scroll never hurts.”
@ awnm
Thanks and good luck with your Hunter.
It’s nice to take a break from high level content now and again.
Fantastic work Garwulf, covers all the basics really well, and explains everything clearly.
Timely for my own level 15 Horde Hunter too!
Nice guide I must say =) Just a small qustion, you said that Intellect would boost your chance to skill up weapons, if I’m correct they removed that along time ago, so enchanting your weapon with +Int wont make leveling new weapon types faster. I might be wrong, but I think they did, and besides it has also been removed from the tooltip.
Looking forward to the next chapters 🙂 Happy leveling.